

How To Burn A File To A Cd Windows 10
Z7_3054ICK0KGTE30AQO5O3KA30N0
HP PCs - Saving Files to Disc (Windows 10, 8)
This document pertains to all HP computers with a writeable deejay drive and Windows x or 8.
If your computer has a CD-RW, DVD-RW, or DVD+RW bulldoze, you tin use information technology to burn a information disc containing files, such as backups of your important documents or mp3 music files.
note:For business PCs, security restrictions might have been put in identify that allow the optical drive to be used only for the read function. To verify, please check with your company's Information technology department or your local It service.
Saving files to a disc
Use the following steps to save files to a disc.
notation:To create a conventional music CD (CD Audio), use Microsoft's Windows Media Player or other software to create your disc. A disc containing MP3 files is not the same as CD Audio and information technology volition not play in older audio players that do not recognize MP3 audio.
-
In Windows, search for and open File Explorer.
-
Click This PC.
-
Right-click the name of the disk bulldoze and select Eject. Remove any discs from the drive that may have ejected at this time.
Figure : Eject a disc

-
Insert a bare disc into the drive and close the drive. The corporeality of free infinite displays below the drive icon and the icon changes to reflect the type of disc that was inserted.
Figure : Drive icon showing that a writeable disc has been inserted

-
Double-click the drive icon to open the Burn a Disc window.
-
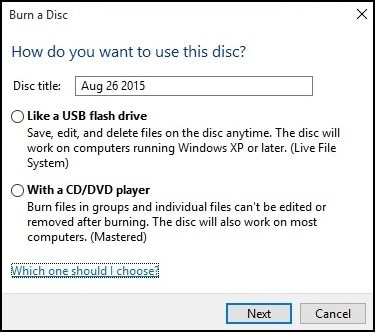
Blazon a title for your disc (default is the date), then select Like a USB flash drive or With a CD/DVD actor, depending on how yous desire to employ the disc.
Figure : Options for how you want to use the disc
-
If you select Like a USB flash bulldoze, the files re-create to the disc. You tin save, edit, and delete files on the disc many times, but the disc might not work in other computers and devices. To employ this option, follow these steps:
-
Click Next in the Burn down a disc window.
A Drag files to this folder to add together them to the disc message displays.
-
Select the files to be added to the disc, then drag them to the drive icon. For example, if you want to copy your garden flower photos from the Pictures binder, drag the Garden Flowers Photos folder to the bulldoze icon.
Figure : Dragging files to the drive icon

-
When all the files are copied, you tin can eject the disc.
-
-
If you select With a CD/DVD histrion, the files are burned to the disc. These files cannot be edited or removed from the disc, but the disc can exist used on most computers. To use this selection, follow these steps:
-
Click Next in the Burn down a disc window. The disc formatting process begins.
A Drag files to this folder to add them to the disc message displays.
-
Navigate to the files, select them, then elevate them to the drive icon.
Figure : Dragging files to the drive icon
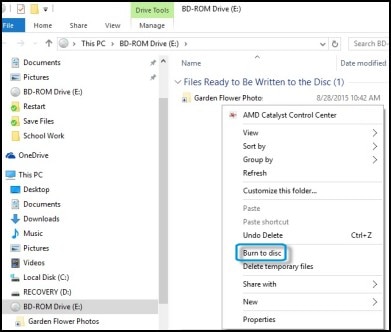
The files brandish in a Files Ready to Exist Written to the Disc window.
-
Right-click the empty area, then select Fire to disc.
Effigy : Selecting Burn to disc
-
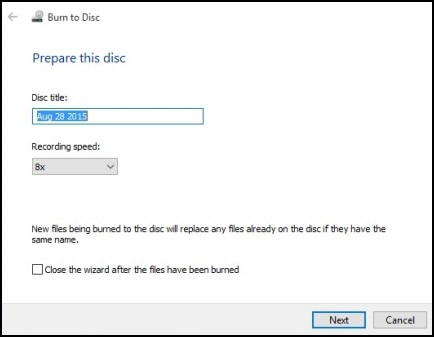
In the Ready this disc window, type the disc championship (default is the engagement), select the recording speed, and then click Adjacent. Your selected files burn down to the disc.
Figure : Prepare this disc window
-
When the fire process is complete, a You take successfully burned your files to the disc windows opens. Click Stop to shut the window.
-
Changing the disc drive recording properties
Apply the post-obit steps to change the disc drive recording backdrop.
-
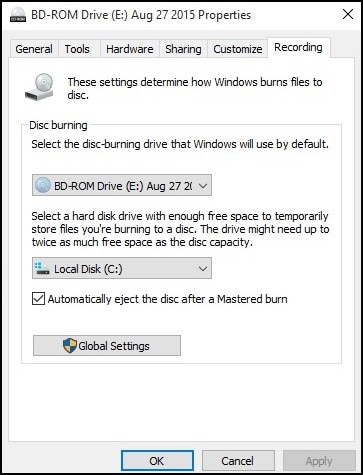
Right-click the drive, select Properties, then click the Recording tab to admission the following window.
Figure : Recording Properties
-
Select Global Settings to cull how the current pdf session closes when a single session or multi session capable disc is ejected.
-
Click OK to save your changes.
Source: https://support.hp.com/id-en/document/c03453031#:~:text=Navigate%20to%20the%20files%2C%20select,them%20to%20the%20drive%20icon.&text=The%20files%20display%20in%20a,then%20select%20Burn%20to%20disc.&text=In%20the%20Prepare%20this%20disc,recording%20speed%2C%20then%20click%20Next.
Posted by: woodsjustat1950.blogspot.com
0 Response to "How To Burn A File To A Cd Windows 10"
Post a Comment